After investigating this particular issue, it turns out that there are several different underlying causes that might be causing this on a Windows 10 computer. Here’s a list of potential culprits that might be responsible for this high RAM resource usage: Now that you know the most frequent instances that will cause this behavior, here’s a list of verified methods that other affected users have successfully used to fix the high resource usage of System (NT Kernel & System):
Method 1: Updating your Windows 10 build to the latest version
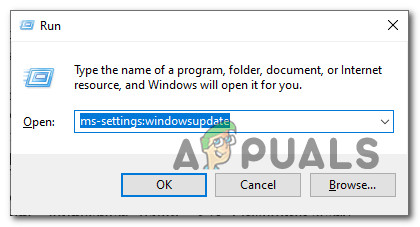
As it turns out, one of the most common instances with the potential of causing this System behavior is a Superfetch bug feature that was already resolved by Microsoft via a hotfix. Several affected users that were dealing with the same issue have confirmed that the problem was no longer occurring after they installed every pending Windows 10 update and restarted their computer. If you’re looking for specific instructions, follow the steps below to use the Windows Update tab inside the Settings app to install every pending Windows 10 update: In case the same kind of issue is still occurring, move down to the next potential fix below.
Method 2: Disabling Sysmain
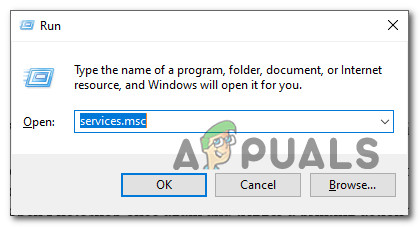
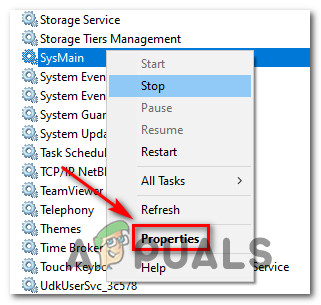
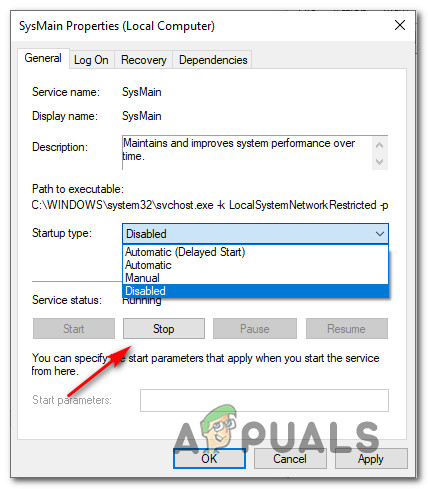
If you’ve ensured that you are updated to the latest Windows 10 build, your next step should be to take a look at the Sysmain service. Sysmain was previously known as Superfetch and it’s responsible for maintaining and improving system performance over time. It does this by preloading apps you frequently use into RAM so there is basically no loading time (similarly to what Android is doing). However, the drawback of this is that if you’re working with a small amount of RAM, this feature might end up taking a huge chunk of your available RAM resources. If you find yourself in this particular scenario, you should be able to fix the problem swiftly by using the Services screen to disable this feature completely. Note: Disabling Sysmain will make the loading times of your apps bigger, but it will free up a lot of valuable RAM. If you understand the consequences of Sysmain and you still want to do it, follow one of the sub guides below to disable Sysmain (depending on your preferred approach):
A. Disabling Sysmain via Services ScreenB. Disabling Sysmain via Registry EditorC. Disabling Sysmain via Command Prompt
A. Disabling Sysmain via Services Screen
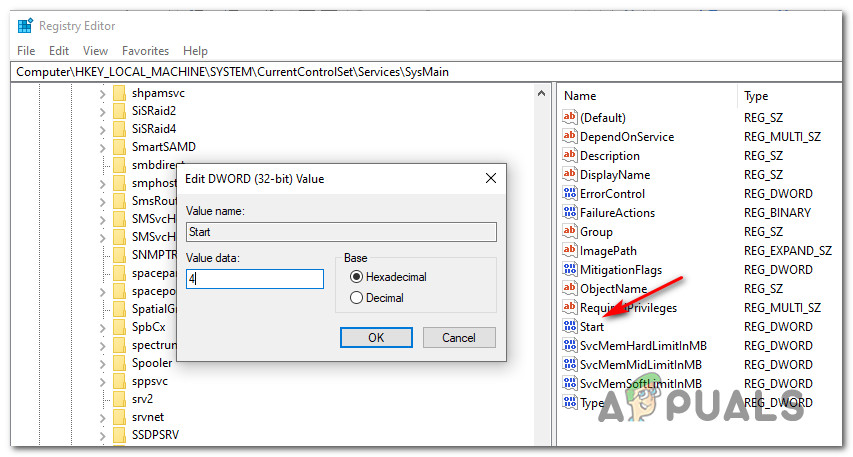
B. Disabling Sysmain via Registry Editor
C. Disabling Sysmain via Command Prompt
If the same issue is still occurring, move down to the next potential fix below.
Method 3: Reset every Windows Component
In case none of the methods (updating your Windows version or disabling Sysmain) have brought the RAM usage of System down, you should seriously take into consideration that you might be dealing a case of system file corruption. Several affected users that were also encountering this problem have reported that usage only went down after refreshing every relevant OS component. If you find yourself in a scenario like this, the only thing you can do is reset every relevant Windows component and eliminate every potentially corrupted element – When it comes to doing this, you have two ways forward:
Clean Install – Go for this approach if you’re looking for a quick fix that can be deployed without the need of using compatible Windows installation media. You can deploy a clean install procedure directly from the GUI menu of your Windows installation, but keep in mind that unless you back up your data in advance, you will lose any personal data that’s currently stored on the OS drive.Repair Install – If you have any important information on the OS drive that you plan on keeping, a repair install should be the way to go for you, even if the procedure is a bit tedious. You’ll need to use compatible installation media, but you will be able to keep your personal files, installed applications, games, and even some user preferences rooted on the OS drive.
Intel Sapphire Rapids Built On 10nm+++ Node, Pack 56 Performance Cores, 64GB…How to Fix Windows Updates Taking Forever to InstallSteam Hardware Survey Out, AMD Taking Shots at Intel in Windows While Losing to…Twitter Taking Too Long To Load Images For You? Keep Calm, You’re Not Alone!